Optimize Cloud Costs for Kubernetes
Background on Cloud Costs
As engineers, we are natural optimizers. Responding to users in more expeditious and efficient ways are core to optimizations. There are always tradeoffs between architecture and costs. With the rise of public cloud consumption with on the surface “nearly infinite” resources, this unlocks the next generation of distributed architecture. Though this is not without cost. From an engineering perspective, cost/billing data from the public cloud vendors depending on your organization might not be available to you or can take multiple billing cycles to be disseminated.
Resources on the public cloud are certainly not free. Public cloud vendors not only bill for the core infrastructure but also depending on the services leveraged could be billing dimensions for the control/management planes and non-obvious dimensions such as network/data transmissions. When capacity planning for infrastructure, a natural inclination is to err on the side of caution and provision extra capacity in case of a spike.
Optimizing costs focuses on right sizing resource usage to match workload actuals. Coupled with finding more emphermial infrastructure e.g spot instances can reduce costs. Monitoring solutions typically monitor for when usage exceeds a certain threshold, but the inverse if usage is under utilized, traditional monitoring solutions might not alert on that. Harness Cloud Cost Management, or CCM, can help unlock insights based on usage in how to optimize costs. This example will connect Kubernetes workload(s) on a public cloud vendor to Harness CCM to start getting cost insights and recommendations.
Get Started with Optimizing Your Kubernetes Cloud Costs
By connecting your public cloud Kubernetes cluster to Harness, you can start to get recommendations on right-sizing the workloads that are running. This example is assuming there are some workloads running in the Kubernetes cluster.
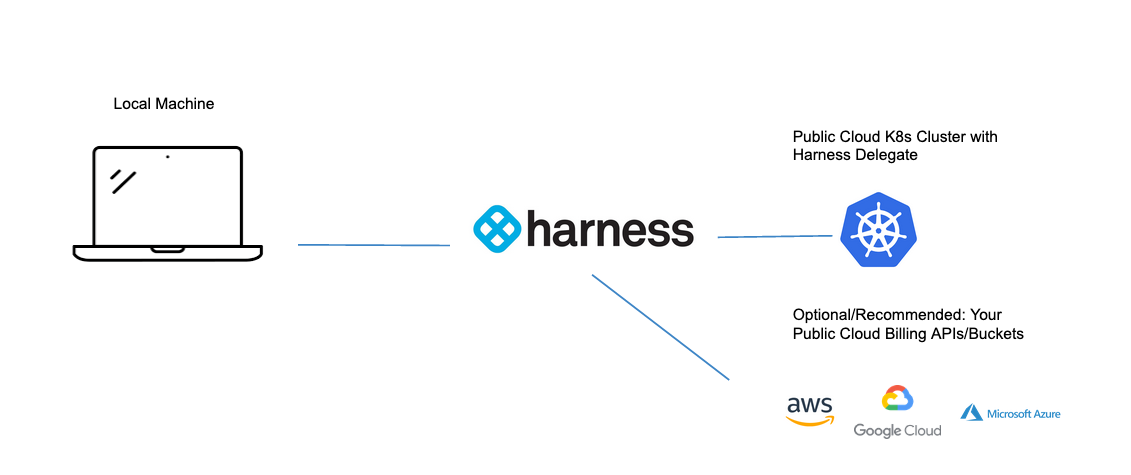
To get actual costing data from your public cloud vendor, it is recommended to connect your public cloud billing API [usage report, billing export, etc] to Harness CCM. This is not a requirement. Harness CCM will poll usage data from the Kubernetes Metric Server which comes installed by default with GKE and AKS. If using EKS, installing the Kubernetes Metric Server is needed.
Prepare Your Kubernetes Cluster for Optimization Recommendations
If you have not already, make sure to sign up for a Harness CCM Account. Once signed up, to start receiving optimizations for your cluster, you will need to install a Harness Delegate, e.g the Harness worker node, into your cluster.
Install Delegate
You will also need to wire in a Kubernetes Delegate if you have not done so already.
Install Delegate
What is Harness Delegate?
Harness Delegate is a lightweight worker process that is installed on your infrastructure and communicates only via outbound HTTP/HTTPS to the Harness Platform. This enables the Harness Platform to leverage the delegate to execute the CI/CD and other tasks on your behalf, without any of your secrets leaving your network.
You can install the Harness Delegate on either Docker or Kubernetes.
You might need additional permissions to execute commands in delegate scripts and create Harness users.
Install Harness Delegate
Create a new delegate token
Log in to the Harness Platform and go to Account Settings -> Account Resources -> Delegates. Select the Tokens tab. Select +New Token, and enter a token name, for example firstdeltoken. Select Apply. Harness Platform generates a new token for you. Select Copy to copy and store the token in a temporary file. You will provide this token as an input parameter in the next installation step. The delegate will use this token to authenticate with the Harness Platform.
Get your Harness account ID
Along with the delegate token, you will also need to provide your Harness accountId as an input parameter during delegate installation. This accountId is present in every Harness URL. For example, in the following URL:
https://app.harness.io/ng/#/account/6_vVHzo9Qeu9fXvj-AcQCb/settings/overview
6_vVHzo9Qeu9fXvj-AcQCb is the accountId.
Now you are ready to install the delegate on either Docker or Kubernetes.
- Kubernetes
- Docker
Prerequisite
Ensure that you have access to a Kubernetes cluster. For the purposes of this tutorial, we will use minikube.
Install minikube
- On Windows:
choco install minikube
- On macOS:
brew install minikube
Now start minikube with the following config.
minikube start --memory 4g --cpus 4
Validate that you have kubectl access to your cluster.
kubectl get pods -A
Now that you have access to a Kubernetes cluster, you can install the delegate using any of the options below.
- Helm Chart
- Terraform Helm Provider
- Kubernetes Manifest
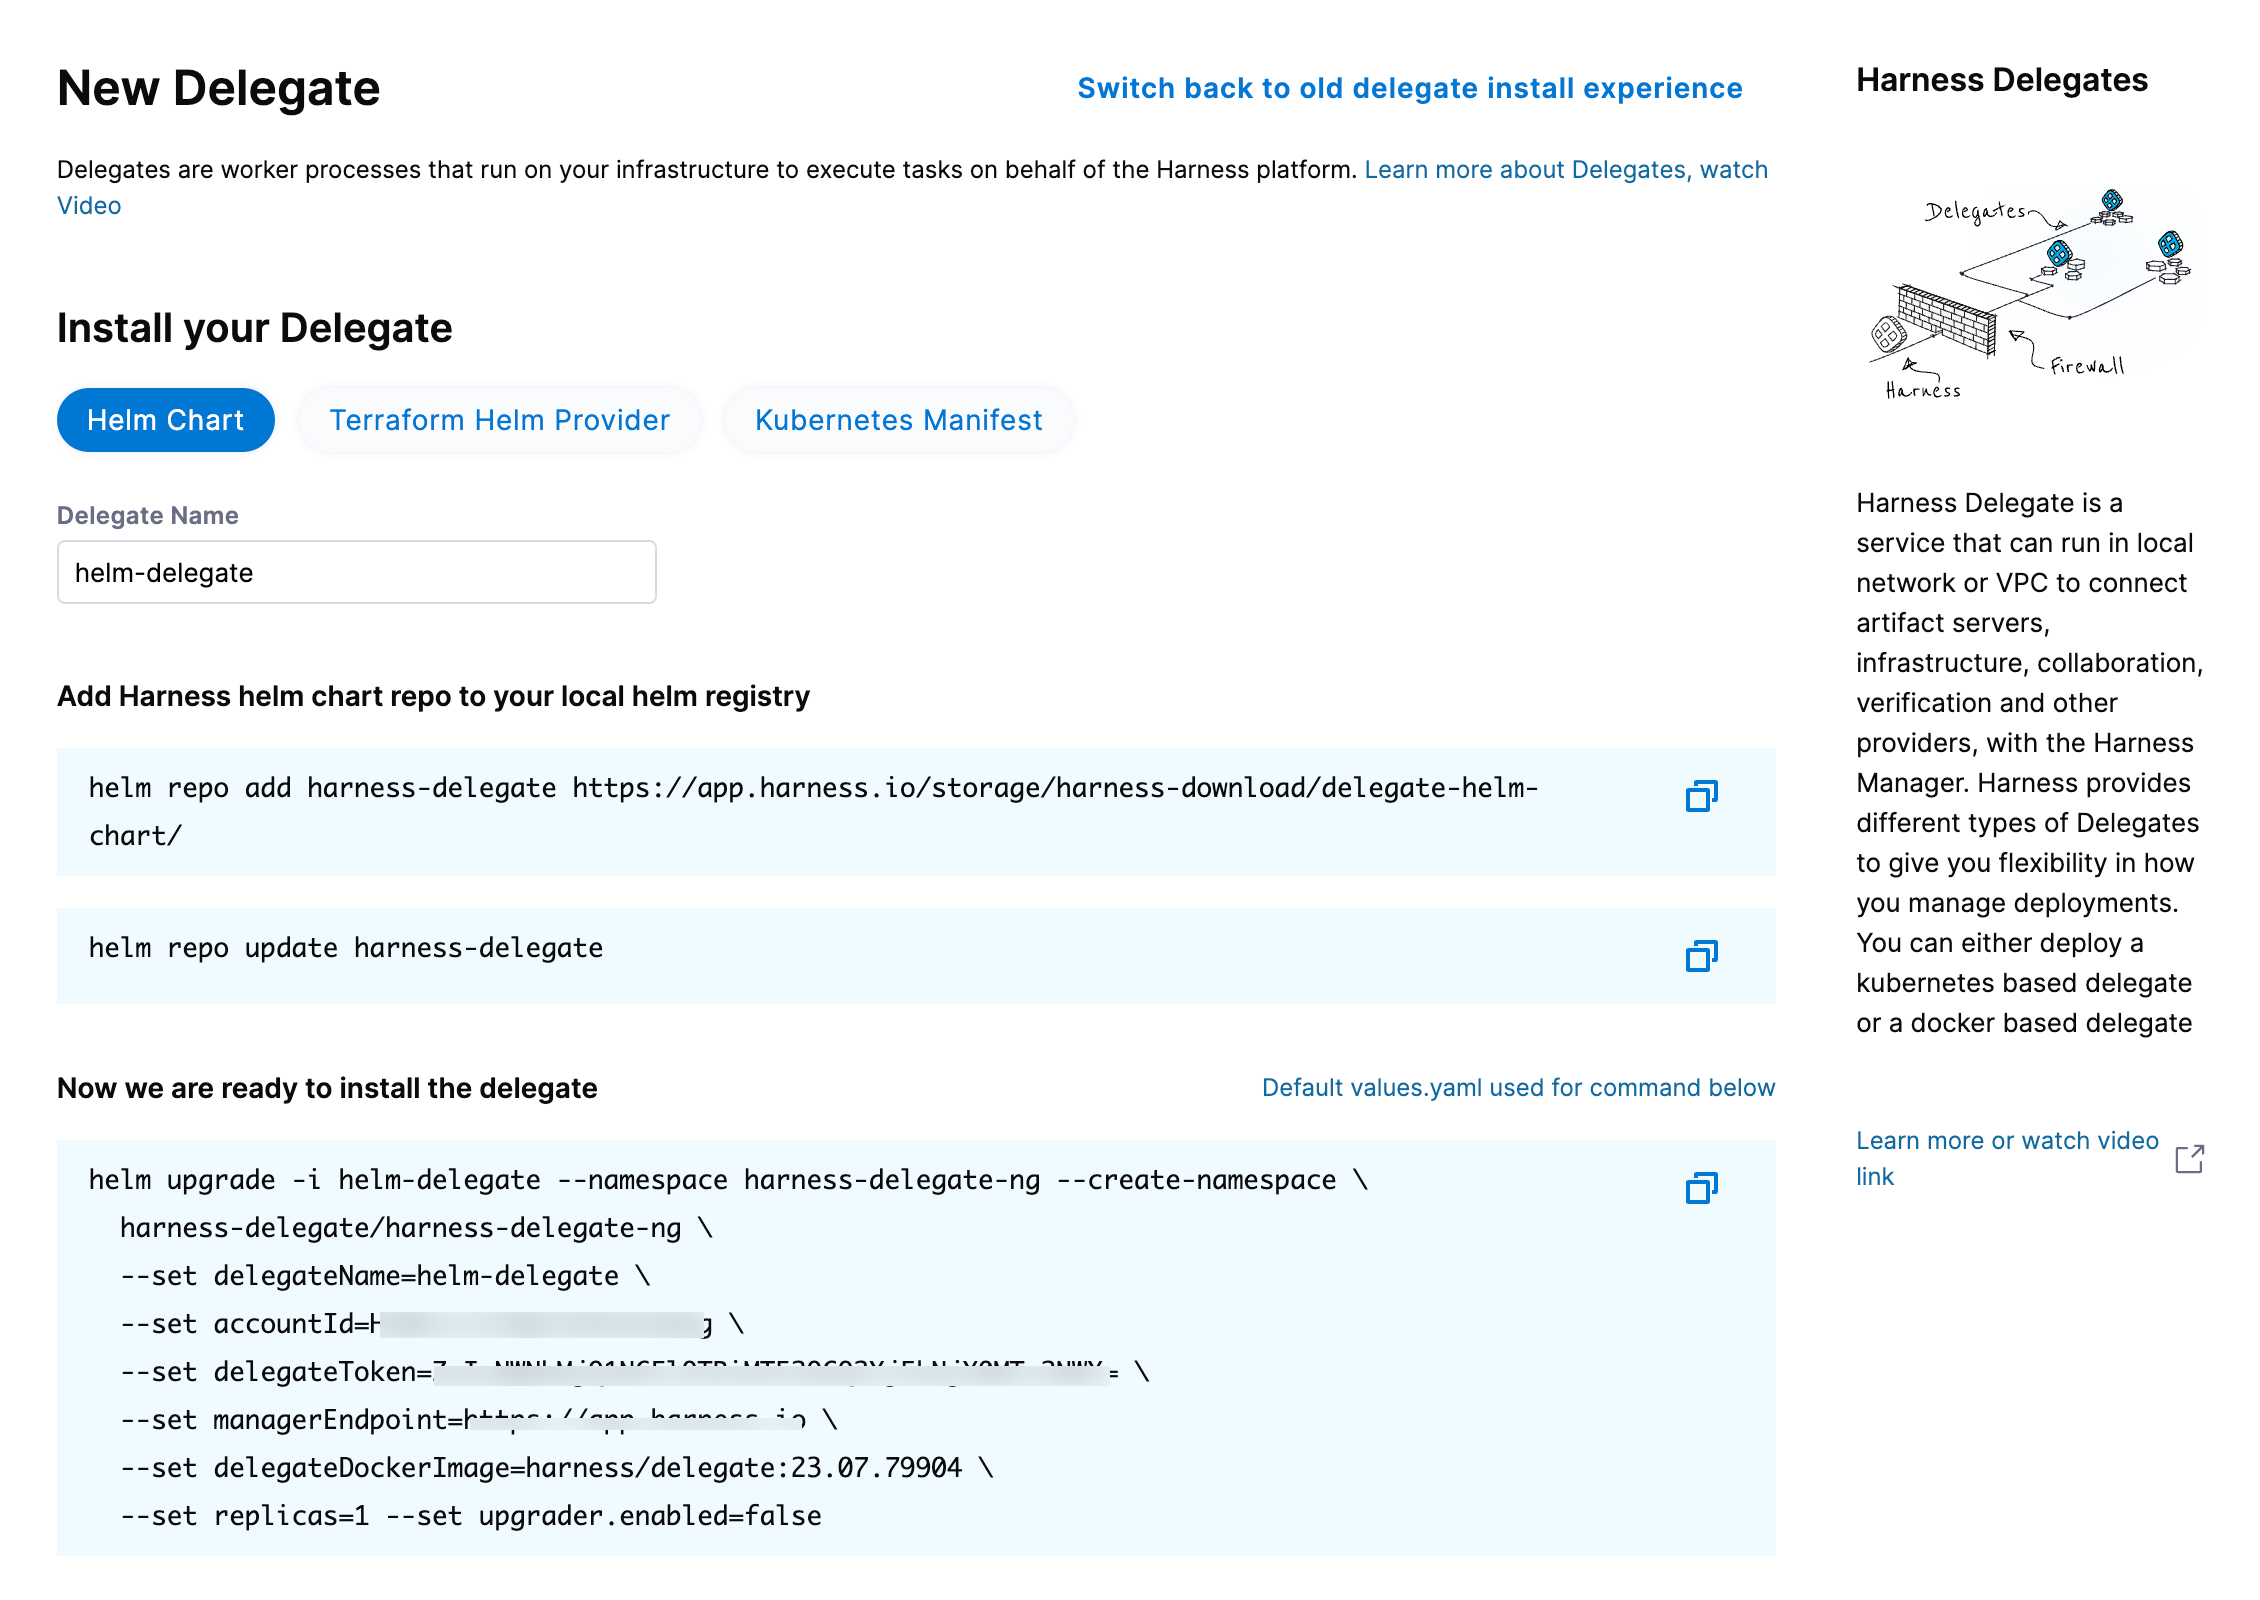
Install the Helm chart
As a prerequisite, you must have Helm v3 installed on the machine from which you connect to your Kubernetes cluster.
You can now install the delegate using the delegate Helm chart. First, add the harness-delegate Helm chart repo to your local Helm registry.
helm repo add harness-delegate https://app.harness.io/storage/harness-download/delegate-helm-chart/
helm repo update
helm search repo harness-delegate
We will use the harness-delegate/harness-delegate-ng chart in this tutorial.
NAME                                	CHART VERSION	APP VERSION	DESCRIPTION
harness-delegate/harness-delegate-ng	1.0.8        	1.16.0     	A Helm chart for deploying harness-delegate
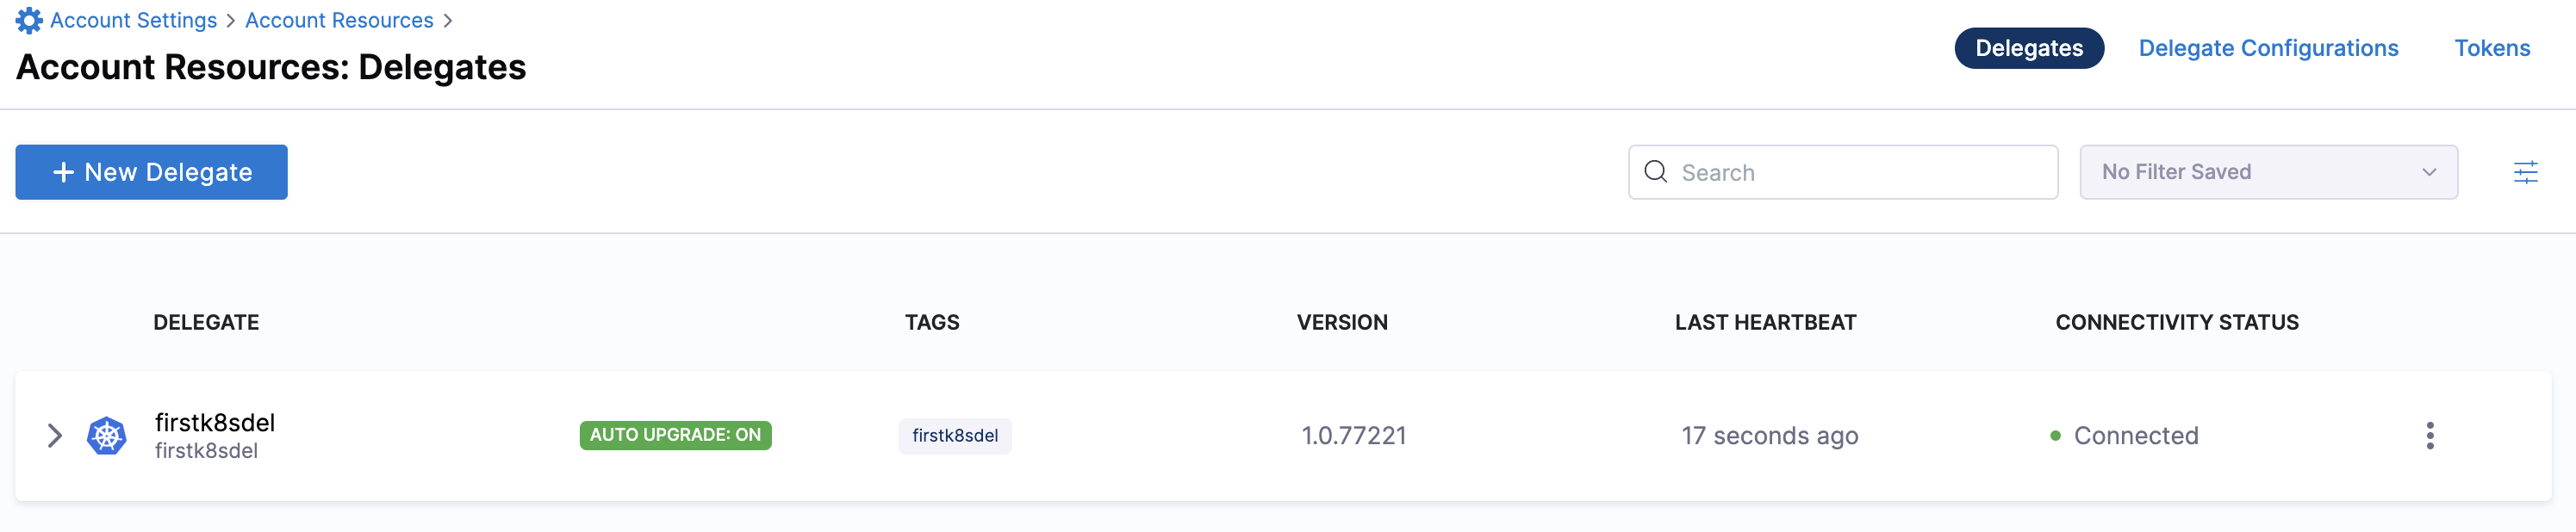
Now we are ready to install the delegate. The following example installs/upgrades firstk8sdel delegate (which is a Kubernetes workload) in the harness-delegate-ng namespace using the harness-delegate/harness-delegate-ng Helm chart.
To install the delegate, do the following:
-
In Harness, select Deployments, then select your project.
-
Under Project Setup, select Delegates.
-
Select Install a Delegate to open the New Delegate dialog.
-
Under Select where you want to install your Delegate, select Kubernetes.
-
Under Install your Delegate, select Helm Chart.
-
Copy the
helm upgradecommand.The command uses the default values.yaml file located in the delegate Helm chart GitHub repo. To make persistent changes to one or more values, you can download and update the
values.yamlfile according to your requirements. Once you have updated the file, you can use it by running the upgrade command below.helm upgrade -i firstk8sdel --namespace harness-delegate-ng --create-namespace \
harness-delegate/harness-delegate-ng \
-f values.yaml \
--set delegateName=firstk8sdel \
--set accountId=PUT_YOUR_HARNESS_ACCOUNTID_HERE \
--set delegateToken=PUT_YOUR_DELEGATE_TOKEN_HERE \
--set managerEndpoint=PUT_YOUR_MANAGER_HOST_AND_PORT_HERE \
--set delegateDockerImage=harness/delegate:yy.mm.verno \
--set replicas=1 --set upgrader.enabled=false
To install a Helm delegate for Harness Self-Managed Enterprise Edition in an air-gapped environment, you must pass your certificate when you add the Helm repo.
helm repo add harness-delegate --ca-file <.PEM_FILE_PATH> <HELM_CHART_URL_FROM_UI>
For more information on requirements for air-gapped environments, go to Install in an air-gapped environment.
- Run the command.
Create main.tf file
Harness uses a Terraform module for the Kubernetes delegate. This module uses the standard Terraform Helm provider to install the Helm chart onto a Kubernetes cluster whose config by default is stored in the same machine at the ~/.kube/config path. Copy the following into a main.tf file stored on a machine from which you want to install your delegate.
module "delegate" {
  source = "harness/harness-delegate/kubernetes"
  version = "0.1.5"

  account_id = "PUT_YOUR_HARNESS_ACCOUNTID_HERE"
  delegate_token = "PUT_YOUR_DELEGATE_TOKEN_HERE"
  delegate_name = "firstk8sdel"
  namespace = "harness-delegate-ng"
  manager_endpoint = "PUT_YOUR_MANAGER_HOST_AND_PORT_HERE"
  delegate_image = "harness/delegate:yy.mm.verno"
  replicas = 1
  upgrader_enabled = false

  # Additional optional values to pass to the helm chart
  values = yamlencode({
    javaOpts: "-Xms64M"
  })
}

provider "helm" {
  kubernetes {
    config_path = "~/.kube/config"
  }
}
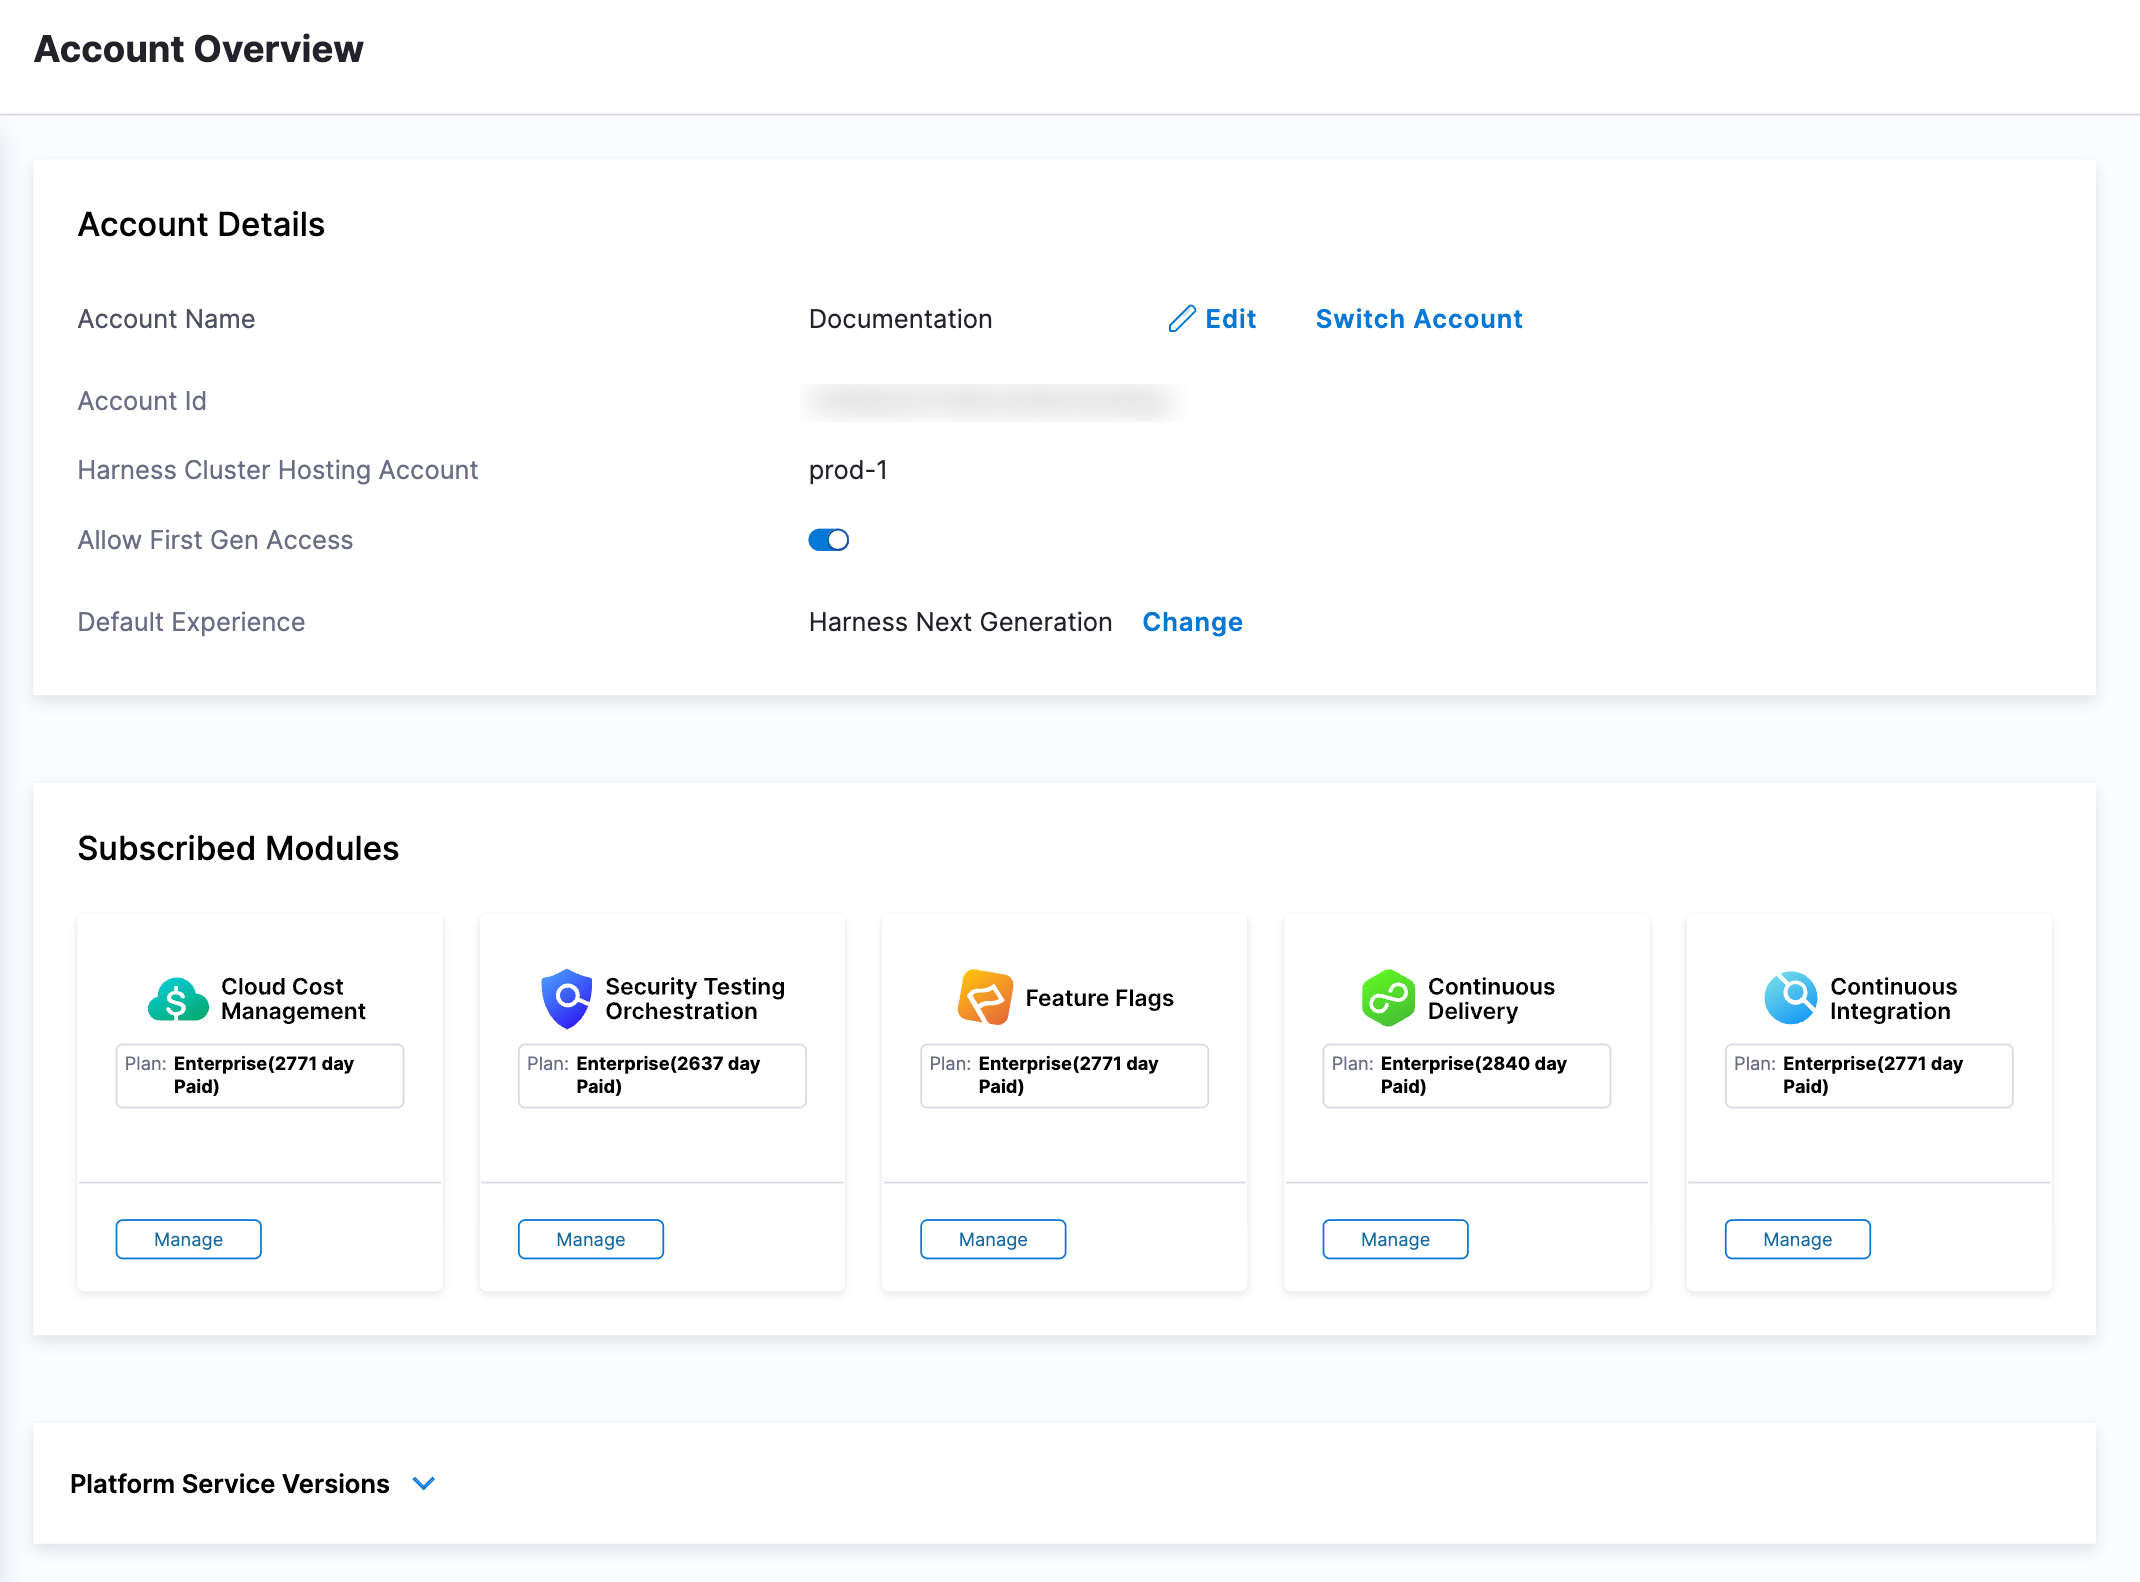
Now replace the variables in the file with your Harness account ID and delegate token values. Replace PUT_YOUR_MANAGER_HOST_AND_PORT_HERE with the Harness Manager Endpoint noted below. For Harness SaaS accounts, you can find your Harness Cluster Location on the Account Overview page under the Account Settings section of the left navigation.
| Harness Cluster Location | Harness Manager Endpoint on Harness Cluster |
|---|---|
| SaaS prod-1 | https://app.harness.io |
| SaaS prod-2 | https://app.harness.io/gratis |
| SaaS prod-3 | https://app3.harness.io |
Run Terraform init, plan, and apply
Initialize Terraform. This downloads the Terraform Helm provider to your machine.
terraform init
Run the following step to view the changes Terraform is going to make on your behalf.
terraform plan
Finally, run this step to make Terraform install the Kubernetes delegate using the Helm provider.
terraform apply
When prompted by Terraform if you want to continue with the apply step, type yes, and then you will see output similar to the following.
helm_release.delegate: Creating...
helm_release.delegate: Still creating... [10s elapsed]
helm_release.delegate: Still creating... [20s elapsed]
helm_release.delegate: Still creating... [30s elapsed]
helm_release.delegate: Still creating... [40s elapsed]
helm_release.delegate: Still creating... [50s elapsed]
helm_release.delegate: Still creating... [1m0s elapsed]
helm_release.delegate: Creation complete after 1m0s [id=firstk8sdel]

Apply complete! Resources: 1 added, 0 changed, 0 destroyed.
Download a Kubernetes manifest template��
curl -LO https://raw.githubusercontent.com/harness/delegate-kubernetes-manifest/main/harness-delegate.yaml
Replace variables in the template
Open the harness-delegate.yaml file in a text editor and replace PUT_YOUR_DELEGATE_NAME_HERE, PUT_YOUR_HARNESS_ACCOUNTID_HERE, and PUT_YOUR_DELEGATE_TOKEN_HERE with your delegate name (for example, firstk8sdel), Harness accountId, and delegate token values, respectively.
Replace the PUT_YOUR_MANAGER_HOST_AND_PORT_HERE variable with the Harness Manager Endpoint noted below. For Harness SaaS accounts, you can find your Harness Cluster Location on the Account Overview page under the Account Settings section of the left navigation.
| Harness Cluster Location | Harness Manager Endpoint on Harness Cluster |
|---|---|
| SaaS prod-1 | https://app.harness.io |
| SaaS prod-2 | https://app.harness.io/gratis |
| SaaS prod-3 | https://app3.harness.io |
Apply the Kubernetes manifest
kubectl apply -f harness-delegate.yaml
Prerequisite
Ensure that you have the Docker runtime installed on your host. If not, use one of the following options to install Docker:
Install on Docker
To install the delegate, do the following:
-
In Harness, select Deployments, then select your project.
-
Under Project Setup, select Delegates.
-
Select Install a Delegate to open the New Delegate dialog.
-
Under Select where you want to install your Delegate, select Docker.
-
Under Install your Delegate, enter a Delegate Name.
-
Copy the
docker runcommand.docker run --cpus=1 --memory=2g \
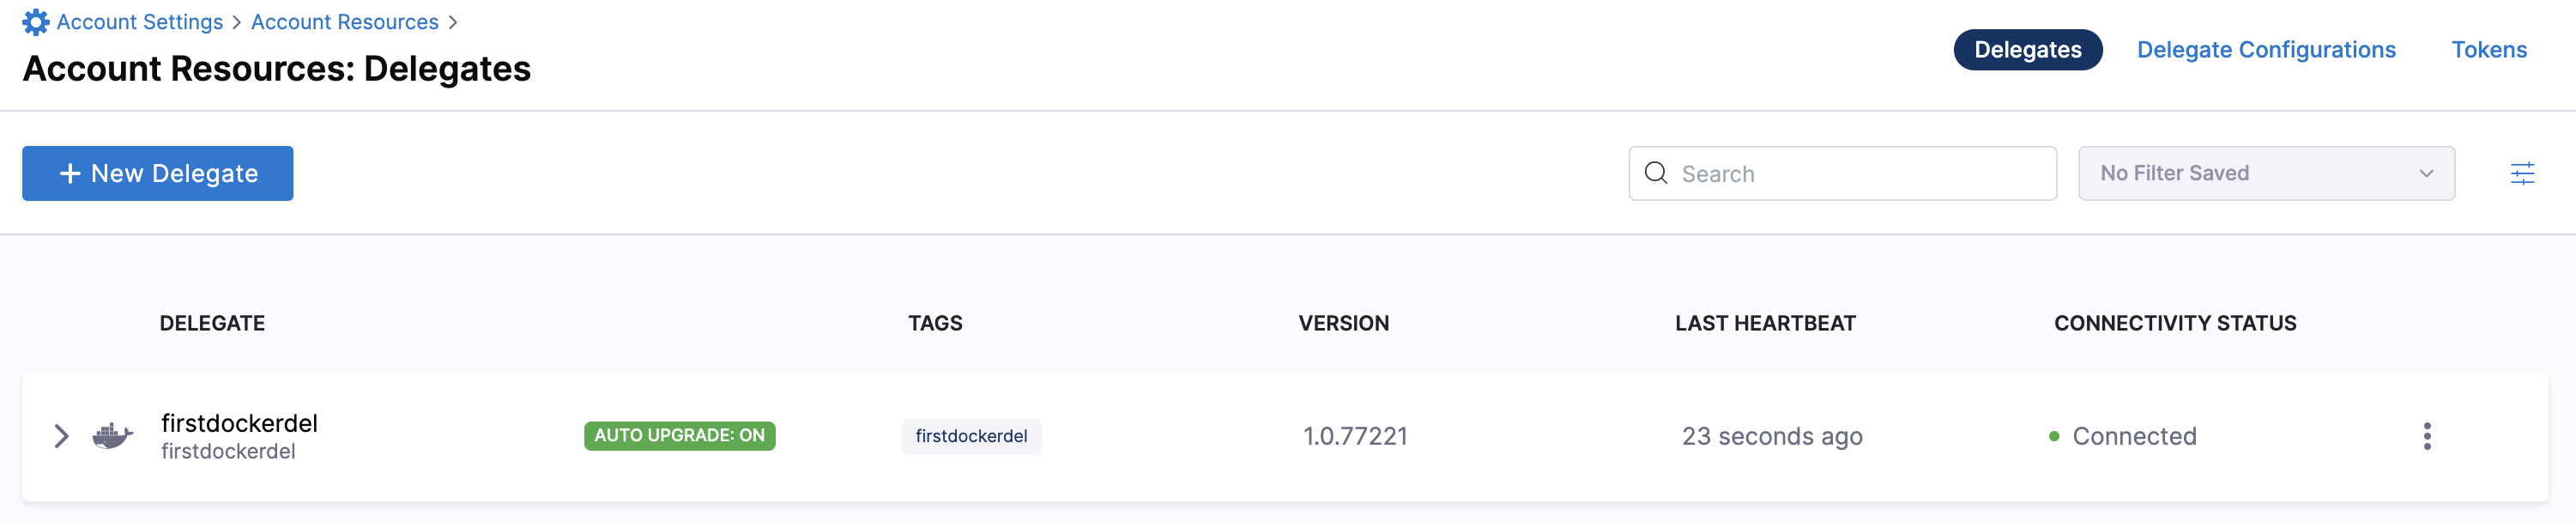
-e DELEGATE_NAME=docker-delegate \
-e NEXT_GEN="true" \
-e DELEGATE_TYPE="DOCKER" \
-e ACCOUNT_ID=PUT_YOUR_HARNESS_ACCOUNTID_HERE \
-e DELEGATE_TOKEN=PUT_YOUR_DELEGATE_TOKEN_HERE \
-e LOG_STREAMING_SERVICE_URL=PUT_YOUR_MANAGER_HOST_AND_PORT_HERE/log-service/ \
-e MANAGER_HOST_AND_PORT=PUT_YOUR_MANAGER_HOST_AND_PORT_HERE \
harness/delegate:yy.mm.verno -
Replace the
PUT_YOUR_MANAGER_HOST_AND_PORT_HEREvariable with the Harness Manager Endpoint noted below. For Harness SaaS accounts, to find your Harness cluster location, select Account Settings, and then select Overview. In Account Overview, look in Account Settings. It is listed next to Harness Cluster Hosting Account. -
Run the command.
For more information, go to View account info and subscribe to downtime alerts.
For Harness CDCE, the endpoint varies based on the Docker vs. Helm installation options.
| Harness Cluster Location | Harness Manager Endpoint on Harness Cluster |
|---|---|
| SaaS prod-1 | https://app.harness.io |
| SaaS prod-2 | https://app.harness.io/gratis |
| SaaS prod-3 | https://app3.harness.io |
If you are using a local runner CI build infrastructure, modify the delegate install command as explained in Use local runner build infrastructure
Deploy using a custom role
During delegate installation, you have the option to deploy using a custom role. To use a custom role, you must edit the delegate YAML file.
Harness supports the following custom roles:
cluster-admincluster-viewernamespace-admin- custom cluster roles
To deploy using a custom cluster role, do the following:
-
Open the delegate YAML file in your text editor.
-
Add the custom cluster role to the
roleReffield in the delegate YAML.---
apiVersion: rbac.authorization.k8s.io/v1beta1
kind: ClusterRoleBinding
metadata:
name: harness-delegate-cluster-admin
subjects:
- kind: ServiceAccount
name: default
namespace: harness-delegate-ng
roleRef:
kind: ClusterRole
name: cluster-admin
apiGroup: rbac.authorization.k8s.io
---In this example, the
cluster-adminrole is defined. -
Save the delegate YAML file.
Verify delegate connectivity
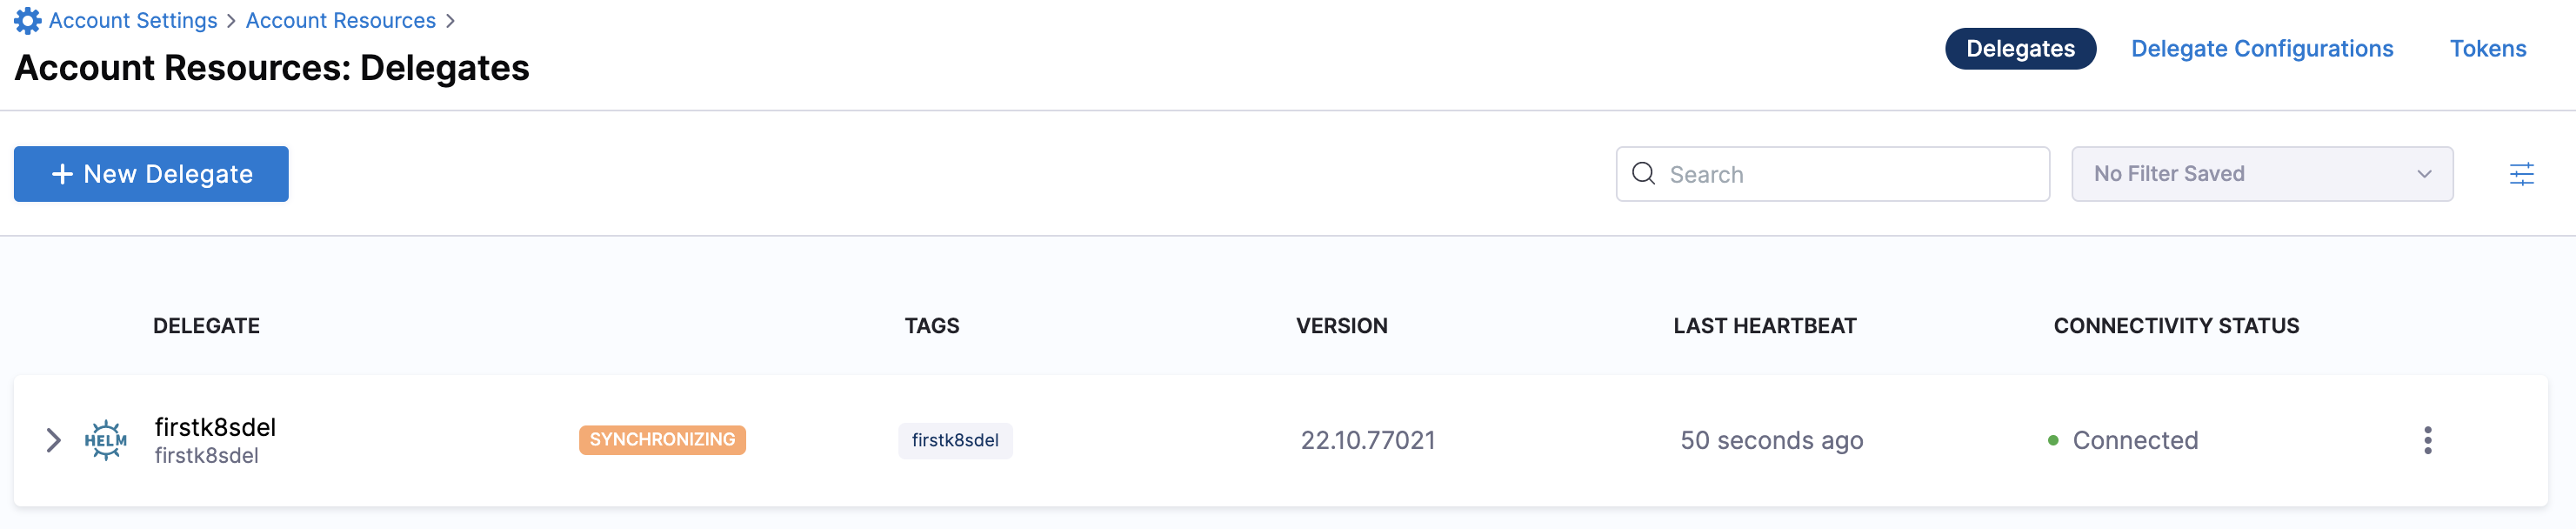
Select Continue. After the health checks pass, your delegate is available for you to use. Select Done and verify your new delegate is listed.
Helm chart & Terraform Helm provider
Kubernetes manifest
Docker
You can now route communication to external systems in Harness connectors and pipelines by selecting this delegate via a delegate selector.
Delegate selectors do not override service infrastructure connectors. Delegate selectors only determine the delegate that executes the operations of your pipeline.
Troubleshooting
The delegate installer provides troubleshooting information for each installation process. If the delegate cannot be verified, select Troubleshoot for steps you can use to resolve the problem. This section includes the same information.
Harness asks for feedback after the troubleshooting steps. You are asked, Did the delegate come up?
If the steps did not resolve the problem, select No, and use the form to describe the issue. You'll also find links to Harness Support and to Delegate docs.
- Helm Chart
- Terraform Helm Provider
- Kubernetes Manifest
- Docker
Use the following steps to troubleshoot your installation of the delegate using Helm.
-
Verify that Helm is correctly installed:
Check for Helm:
helmAnd then check for the installed version of Helm:
helm versionIf you receive the message
Error: rendered manifests contain a resource that already exists..., delete the existing namespace, and retry the Helm upgrade command to deploy the delegate.For further instructions on troubleshooting your Helm installation, go to Helm troubleshooting guide.
-
Check the status of the delegate on your cluster:
kubectl describe pods -n <namespace> -
If the pod did not start, check the delegate logs:
kubectl logs -f <harnessDelegateName> -n <namespace>If the state of the delegate pod is
CrashLoopBackOff, check your allocation of compute resources (CPU and memory) to the cluster. A state ofCrashLoopBackOffindicates insufficient Kubernetes cluster resources. -
If the delegate pod is not healthy, use the
kubectl describecommand to get more information:kubectl describe <pod_name> -n <namespace>
Use the following steps to troubleshoot your installation of the delegate using Terraform.
-
Verify that Terraform is correctly installed:
terraform -versionFor further instructions on troubleshooting your installation of Terraform, go to the Terraform troubleshooting guide.
-
Check the status of the delegate on your cluster:
kubectl describe pods -n <namespace> -
If the pod did not start, check the delegate logs:
kubectl logs -f <harnessDelegateName> -n <namespace>If the state of the delegate pod is
CrashLoopBackOff, check your allocation of compute resources (CPU and memory) to the cluster. A state ofCrashLoopBackOffindicates insufficient Kubernetes cluster resources. -
If the delegate pod is not healthy, use the
kubectl describecommand to get more information:kubectl describe <pod_name> -n <namespace>
Use the following steps to troubleshoot your installation of the delegate using Kubernetes.
-
Check the status of the delegate on your cluster:
kubectl describe pods -n <namespace> -
If the pod did not start, check the delegate logs:
kubectl logs -f <harnessDelegateName> -n <namespace>If the state of the delegate pod is
CrashLoopBackOff, check your allocation of compute resources (CPU and memory) to the cluster. A state ofCrashLoopBackOffindicates insufficient Kubernetes cluster resources. -
If the delegate pod is not healthy, use the
kubectl describecommand to get more information:kubectl describe <pod_name> -n <namespace>
Use the following steps to troubleshoot your installation of the delegate using Docker:
-
Check the status of the delegate on your cluster:
docker container ls -a -
If the pod is not running, check the delegate logs:
docker container logs <delegatename> -f -
Restart the delegate container. To stop the container:
docker container stop <delegatename>To start the container:
docker container start <delegatename> -
Make sure the container has sufficient CPU and memory resources. If not, remove the older containers:
docker container rm [container id]
Pointing Harness CCM to Your Cluster
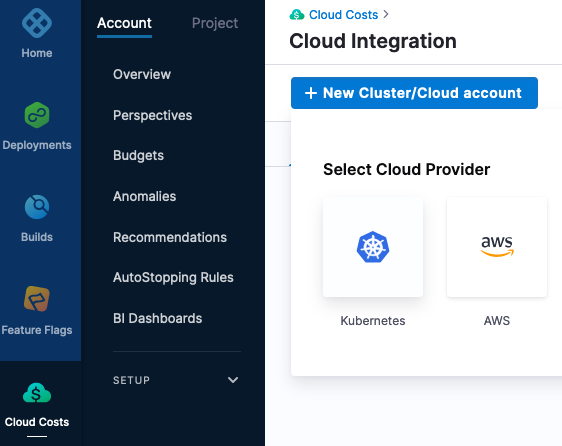
With the Harness Delegate running, the next step is to create a Cloud Integration which will represent your Kubernetes cluster.
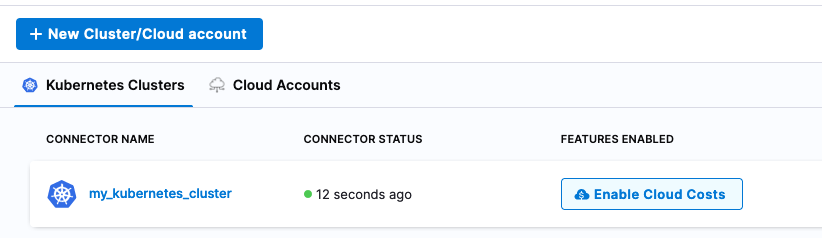
Harness Platform -> Cloud Costs -> Setup -> Cloud Integration + New Cluster/Cloud Account
Select Kubernetes.
Once Kubernetes is selected, now we can configure the Kubernetes Cluster connector.
Name: my_kubernetes_cluster
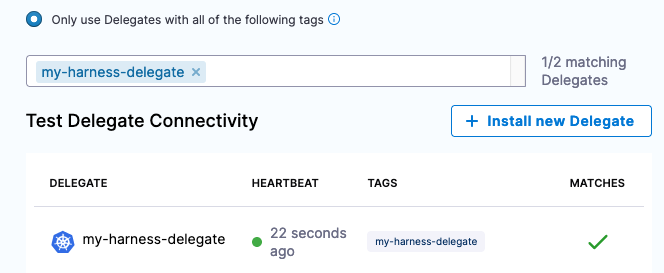
Click Continue then in the Details section, leverage the Harness Delegate to connect to the Kubernetes cluster.
Click Continue, then select the Harness Delegate that is running inside your cluster.
Enabling Cloud Costs
Click Save and Continue and a connection test will occur and validate connectivity. With the Kubernetes cluster wired in, you can enable the wirings for the reporting.
Under the “Features Enabled” column, click Enable Cloud Costs.
In the click-through, validation will occur and then click Finish. If additional permissions are needed, the wizard will guide you through enabling them.
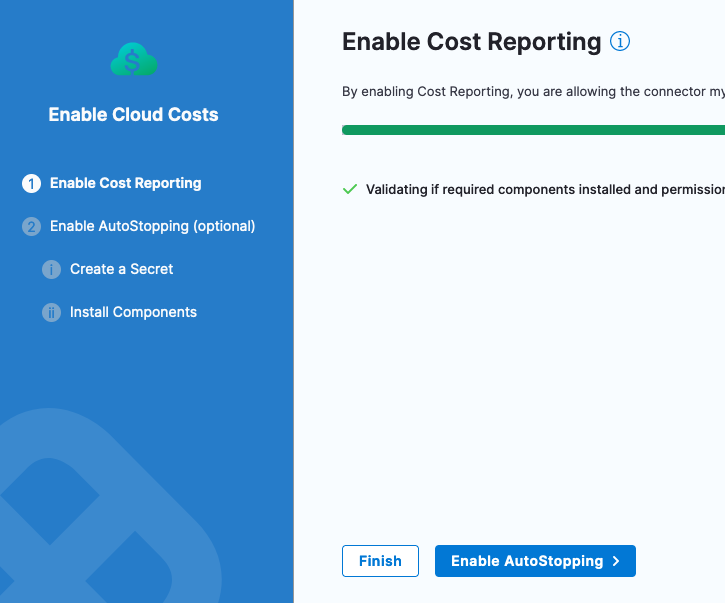
Once you click Finish, Harness will start to analyze data around workload usage.

Note, that initial recommendation and costing data can take up to 24 hours to start being reported/calculated.
After a few hours, cost information will start to be imported. Since in this example we did not connect a public cloud billing bucket, list pricing will be used in cost calculation.
Harness -> Cloud Costs -> Setup -> Cloud Integration -> my_kubernetes_cluster -> View Costs
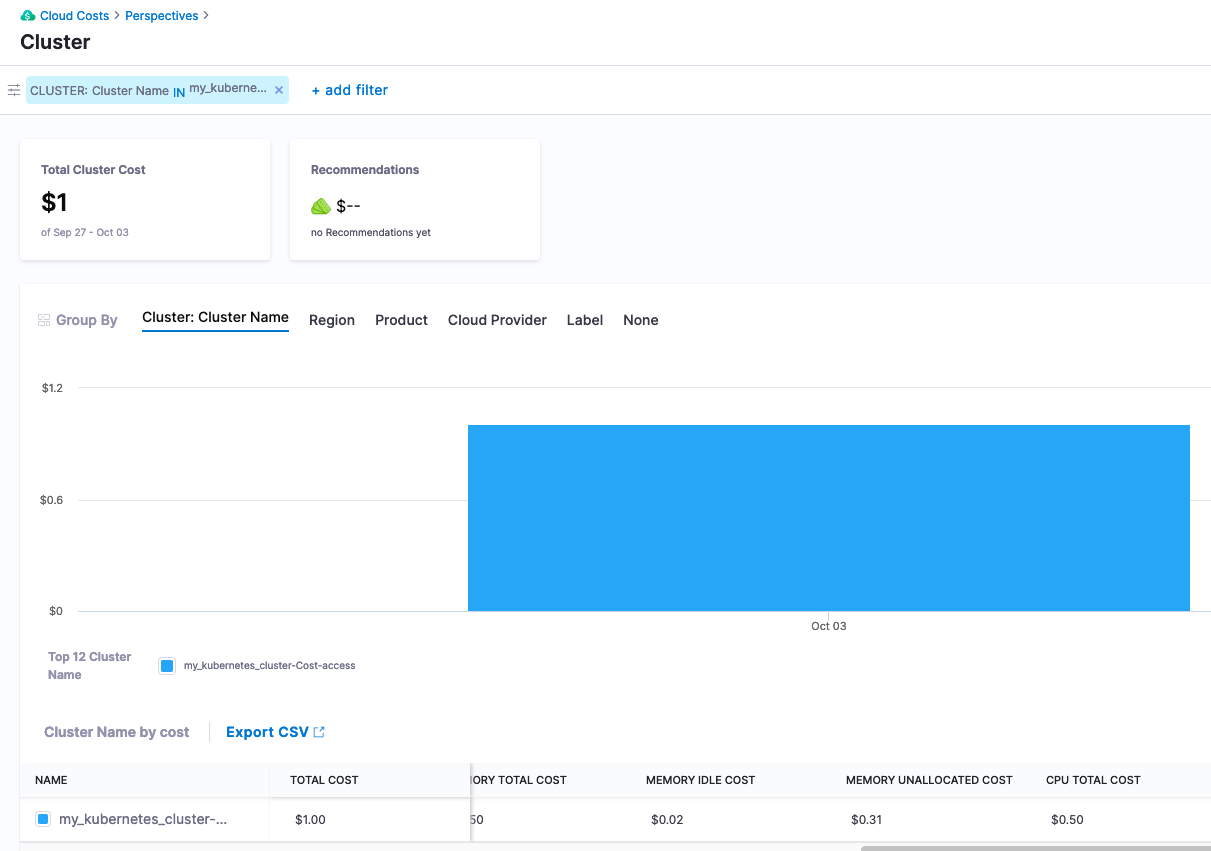
After about a day, more usage data will be captured and recommendations will start to appear.
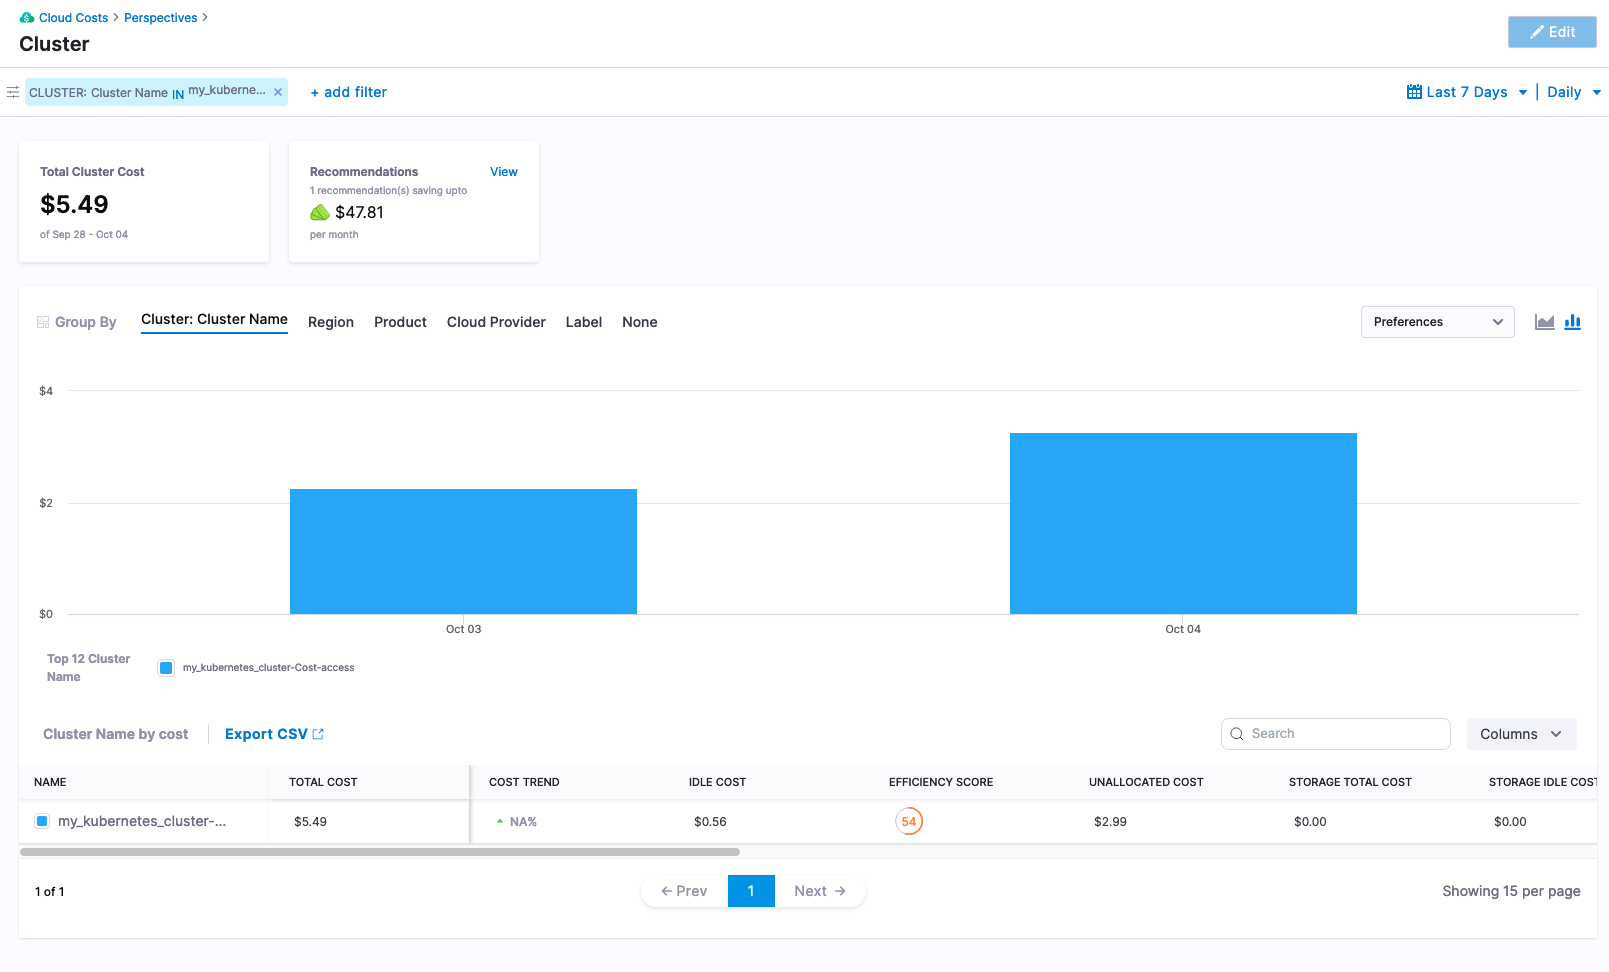
Digging into the savings recommendation, Harness CCM will provide recommendations off of the usage data captured.
Looking at Your First Cost Optimizations
Digging into the recommendations list, looking at a recommendation that corresponds to the Kubernetes cluster, can see that the cluster is sized much larger than the resources that are being consumed.
Harness -> Cloud Costs -> Recommendations -> Your Resource
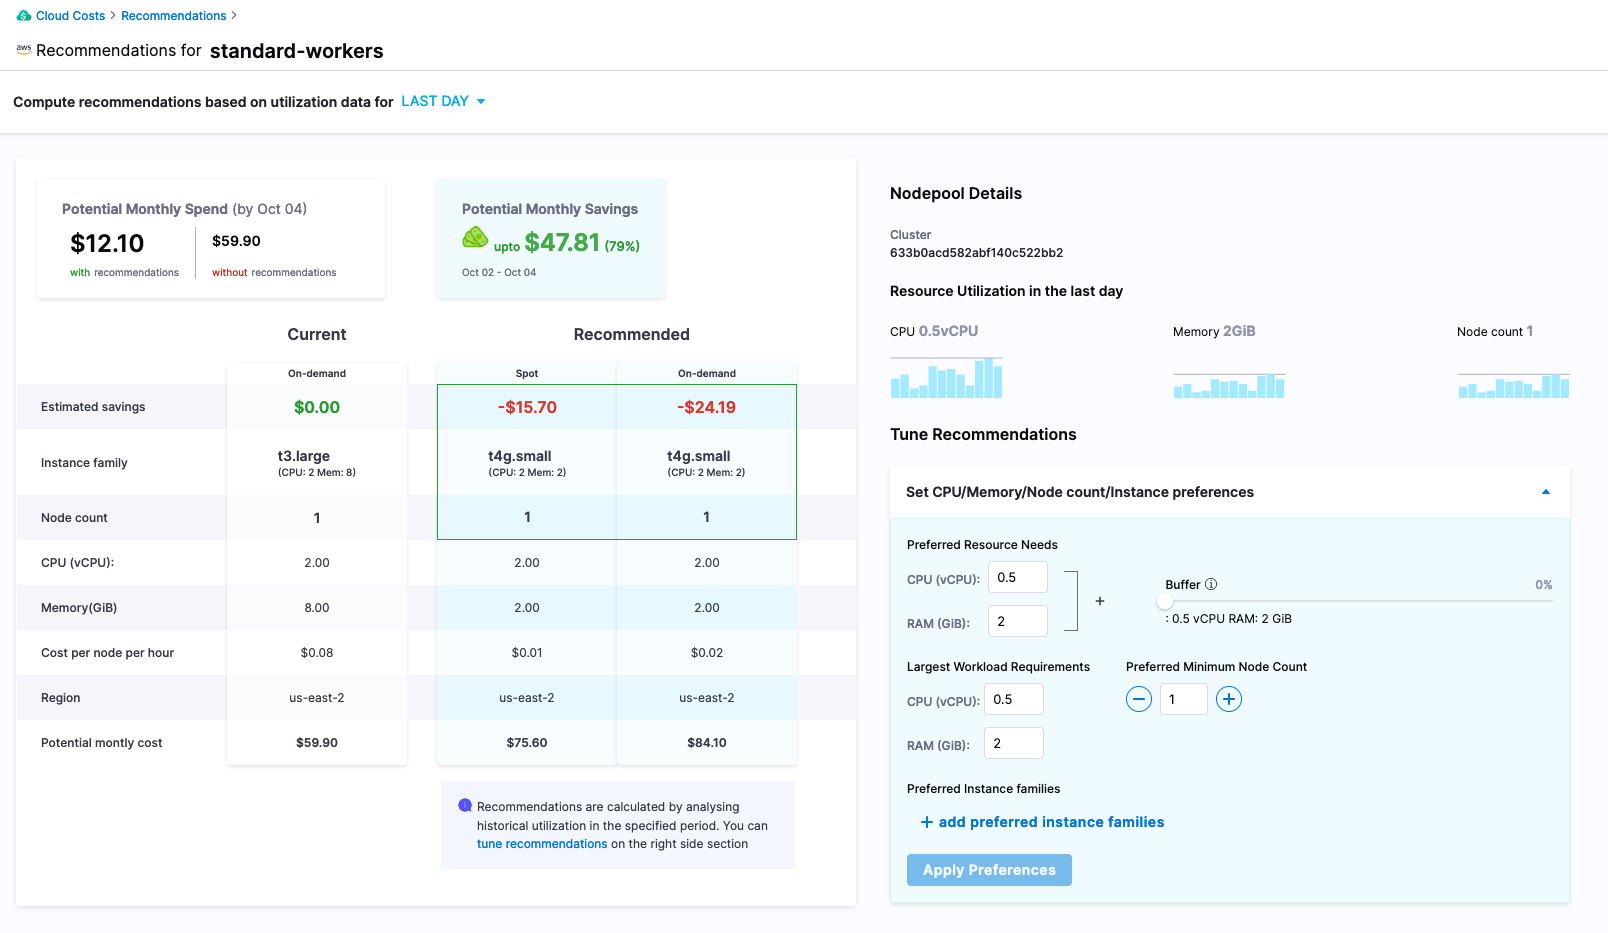
Per this recommendation, resizing the worker node machine size is a prudent move. Taking a look at the back work for the recommendation, can take a look at the actual usage back in the previous perspective. Actions to be taken to reduce costs would be to right size the nodes and if not already, can place resource requests and limits onto the Kubernetes workloads based on what Harness CCM is reporting. This is just the start of the capabilities with Harness CCM, which can also provide additional rules and capabilities around auto-stopping of workloads and give additional infrastructure and workload recommendations. If additional changes are needed, can leverage the Harness Platform to experiment and make those changes.